Day 19: Expanded, Flexible & Spacer
Stop getting "RenderFlex overflowed" errors! Learn Expanded vs Flexible vs Spacer in Flutter with live examples. Build responsive layouts that work on every device. 📱💻

မနေ့က UI ပေါ်မှာ နေရာချတဲ့အခါ အသုံးပြုလေ့ရှိတဲ့ Container တွေ၊ Row တွေ၊ Column တွေအကြောင်း ပြောပြီးပြီဆိုတော့ ဒီနေ့တော့ Flutter ရဲ့ Flexbox system မှာ မပါမဖြစ် Expanded, Flexible, Spacer တို့အကြောင်း ဆက်ကြည့်ရအောင်ပါ။
Flutter မှာ UI တွေစပြီး တည်ဆောက်ပြီဆို overflowed ဆိုပြီး အဝါနဲ့အမဲနဲ့ အောက်မှာ ပြထားသလိုမျိုး ပေါ်လာတာကို တွေ့ဖူးကြမယ်ထင်ပါတယ်။
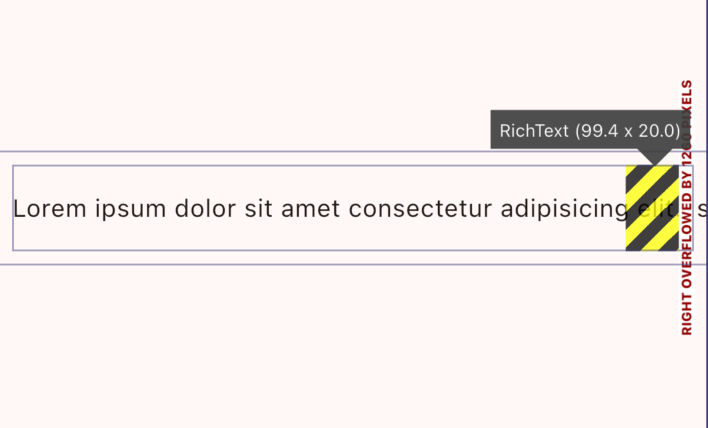
ဒါကတော့ UI ကို သတ်မှတ်တဲ့အခါ ရှိတဲ့ width, height တွေထက် ကျော်သွားပြီး UI က ဘာလုပ်လို့ လုပ်ရမှန်းမသိတော့တဲ့အခါ ပြပေးတာပဲ ဖြစ်ပါတယ်။ Construction လုပ်နေသလိုလို ဘာလိုလိုနဲ့ ပြပေးနေတာမျိုးပါ။ ဒီလိုမျိုး error တွေ ပြနေတဲ့အခါ ဖြေရှင်းပေးဖို့လိုပါတယ်။
ဒီလို error မျိုးတွေ ဖြေရှင်းဖို့ဆိုရင် Flutter ရဲ့ Flexbox system ကို နားလည်ထားဖို့ လိုအပ်ပါတယ်။ Expanded, Flexible နဲ့ Spacer တို့ကို သုံးပြီးတော့ အပေါ်မှာ ပြထားသလို error တွေ မပေါ်အောင် UI တွေ တည်ဆောက်လို့ရပါတယ်။ UI ကလဲ user တွေရဲ့ device size အမျိုးမျိုးမှာ လိုအပ်သလို ညှိပြီး လုပ်ပြီး အလုပ်လုပ်နေမှာပါ။
Expanded
ဒါကတော့ အသုံးအများဆုံးပဲ ဖြစ်ပါတယ်။ သူ့ထဲမှာပါတဲ့ child widget ကို ရတဲ့နေရာ အကုန်ယူဖို့ သတ်မှတ်ချင်တဲ့အခါ အသုံးပြုလို့ ရပါတယ်။ Expanded ဆိုတဲ့ နာမည်အတိုင်းပဲ ချဲ့လို့ရတဲ့နေရာ တခုလုံးကို ချဲ့ပြီးတော့ နေရာယူသွားမှာပါ။
Row(
  children: [
    const Icon(Icons.person, color: Colors.blue),
    const SizedBox(width: 10),
    const Expanded(
      child: Column(
        crossAxisAlignment: CrossAxisAlignment.start,
        mainAxisSize: MainAxisSize.min,
        children: [
          Text("User Name", style: TextStyle(fontWeight: FontWeight.bold)),
          Text(
            "This is a very long post description that would normally cause overflow!",
            maxLines: 1,
            overflow: TextOverflow.ellipsis,
          ),
        ],
      ),
    ),
    const Icon(Icons.more_vert),
  ],
)
flex ကတော့ Expanded widget တခုထက်ပိုပြီး သုံးကြတဲ့အခါ ဘယ် widget က ဘယ်လောက်ထိ expand လုပ်မလဲဆိုတာ သတ်မှတ်ပေးတာမျိုးပါ။
Column(
  children: [
    Expanded(flex: 3, child: Container(color: Colors.red)), // 75%
    Expanded(flex: 1, child: Container(color: Colors.blue)), // 25%
  ],
)
Flexible
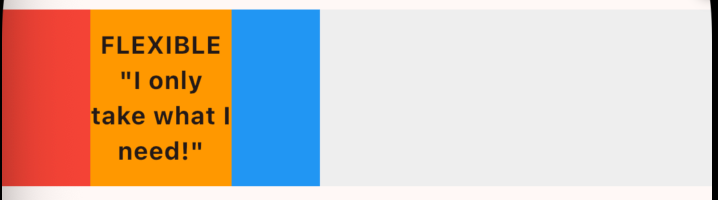
ဒါကတော့ expanded အလုပ်လုပ်ပုံနဲ့ အနည်းငယ် ဆင်ပါတယ်။ သူ့ကိုတော့ ရတဲ့နေရာထက် သေးပြီးတော့ လိုအပ်သလောက်ပဲ တည်ဆောက်ချင်တဲ့အခါ အသုံးပြုပါတယ်။
Container(
  height: 100,
  color: Colors.grey[200],
  child: Row(
    children: [
      Container(width: 50, color: Colors.red),
      Flexible(
        child: Container(
          color: Colors.orange,
          width: 80, // ⚡ THIS IS THE KEY DIFFERENCE!
          child: Center(
            child: Text('FLEXIBLE\n"I only take what I need!"',
              textAlign: TextAlign.center,
              style: TextStyle(fontWeight: FontWeight.bold),
            ),
          ),
        ),
      ),
      Container(width: 50, color: Colors.blue),
    ],
  ),
),
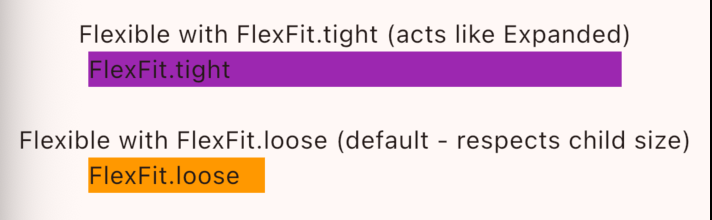
Flexible widget မှာ fit ဆိုတဲ့ properties လဲ ရှိပါတယ် ဒါကတော့ flex က ဘယ်လိုအလုပ်လုပ်မှာလဲ သတ်မှတ်ပေးလို့ ရတာမျိုးပါ။ fit ကို FlexFit.tight လို့ ရေးလိုက်ရင် Expanded နဲ့ အလုပ်လုပ်ပုံ တူသွားပါလိမ့်မယ်။ fit ကို FlexFit.loose နဲ့ အများဆုံး သတ်မှတ်ပြီး အသုံးပြုပါတယ်။ default behaviour လဲ ဖြစ်ပါတယ်။
class FlexFitComparison extends StatelessWidget {
  @override
  Widget build(BuildContext context) {
    return Column(
      children: [
        Text('Flexible with FlexFit.tight (acts like Expanded)'),
        Row(
          children: [
            Container(width: 50, color: Colors.red),
            Flexible(
              fit: FlexFit.tight, // 👈 FORCES full expansion
              child: Container(
                color: Colors.purple,
                child: Text('FlexFit.tight'),
              ),
            ),
            Container(width: 50, color: Colors.blue),
          ],
        ),

        SizedBox(height: 20),

        Text('Flexible with FlexFit.loose (default - respects child size)'),
        Row(
          children: [
            Container(width: 50, color: Colors.red),
            Flexible(
              fit: FlexFit.loose, // 👈 Allows child to be smaller
              child: Container(
                color: Colors.orange,
                width: 100,
                child: Text('FlexFit.loose'),
              ),
            ),
            Container(width: 50, color: Colors.blue),
          ],
        ),
      ],
    );
  }
}
Expanded(child: Widget()) = Flexible(fit: FlexFit.tight, child: Widget())
Spacer
ဒါကတော့ child သတ်မှတ်ပေးဖို့မလိုတဲ့ expanded widget လို့ ပြောလို့ရပါတယ်။ ရတဲ့နေရာကို ယူပြီးတော့ တခြား component တွေကို ဘယ်ညာ တွန်းဖို့ လိုအပ်တာမျိုးမှာ အသုံးပြုပါတယ်။
ဒီမှာဆို Text ၂ခုကြားမှာ Spacer ဆိုပြီး ထည့်ပေးလိုက်တာ ဖြစ်တဲ့အတွက် ဘယ်ညာကို တွန်းပေးနေမှာပဲ ဖြစ်ပါတယ်။
Row(
  children: [
    Text('Left'),
    Spacer(), // 👈 Pushes everything apart!
    Text('Right'),
  ],
)
Spacer() = Expanded(child: SizedBox())ဒါဆိုရင်တော့ တကယ့်လက်တွေ့ UI တခုလောက်ကို ကျွန်တော်တို့ လေ့လာပြီးသား concept တွေ နဲ့ ရေးကြည့်ရအောင်ပါ။
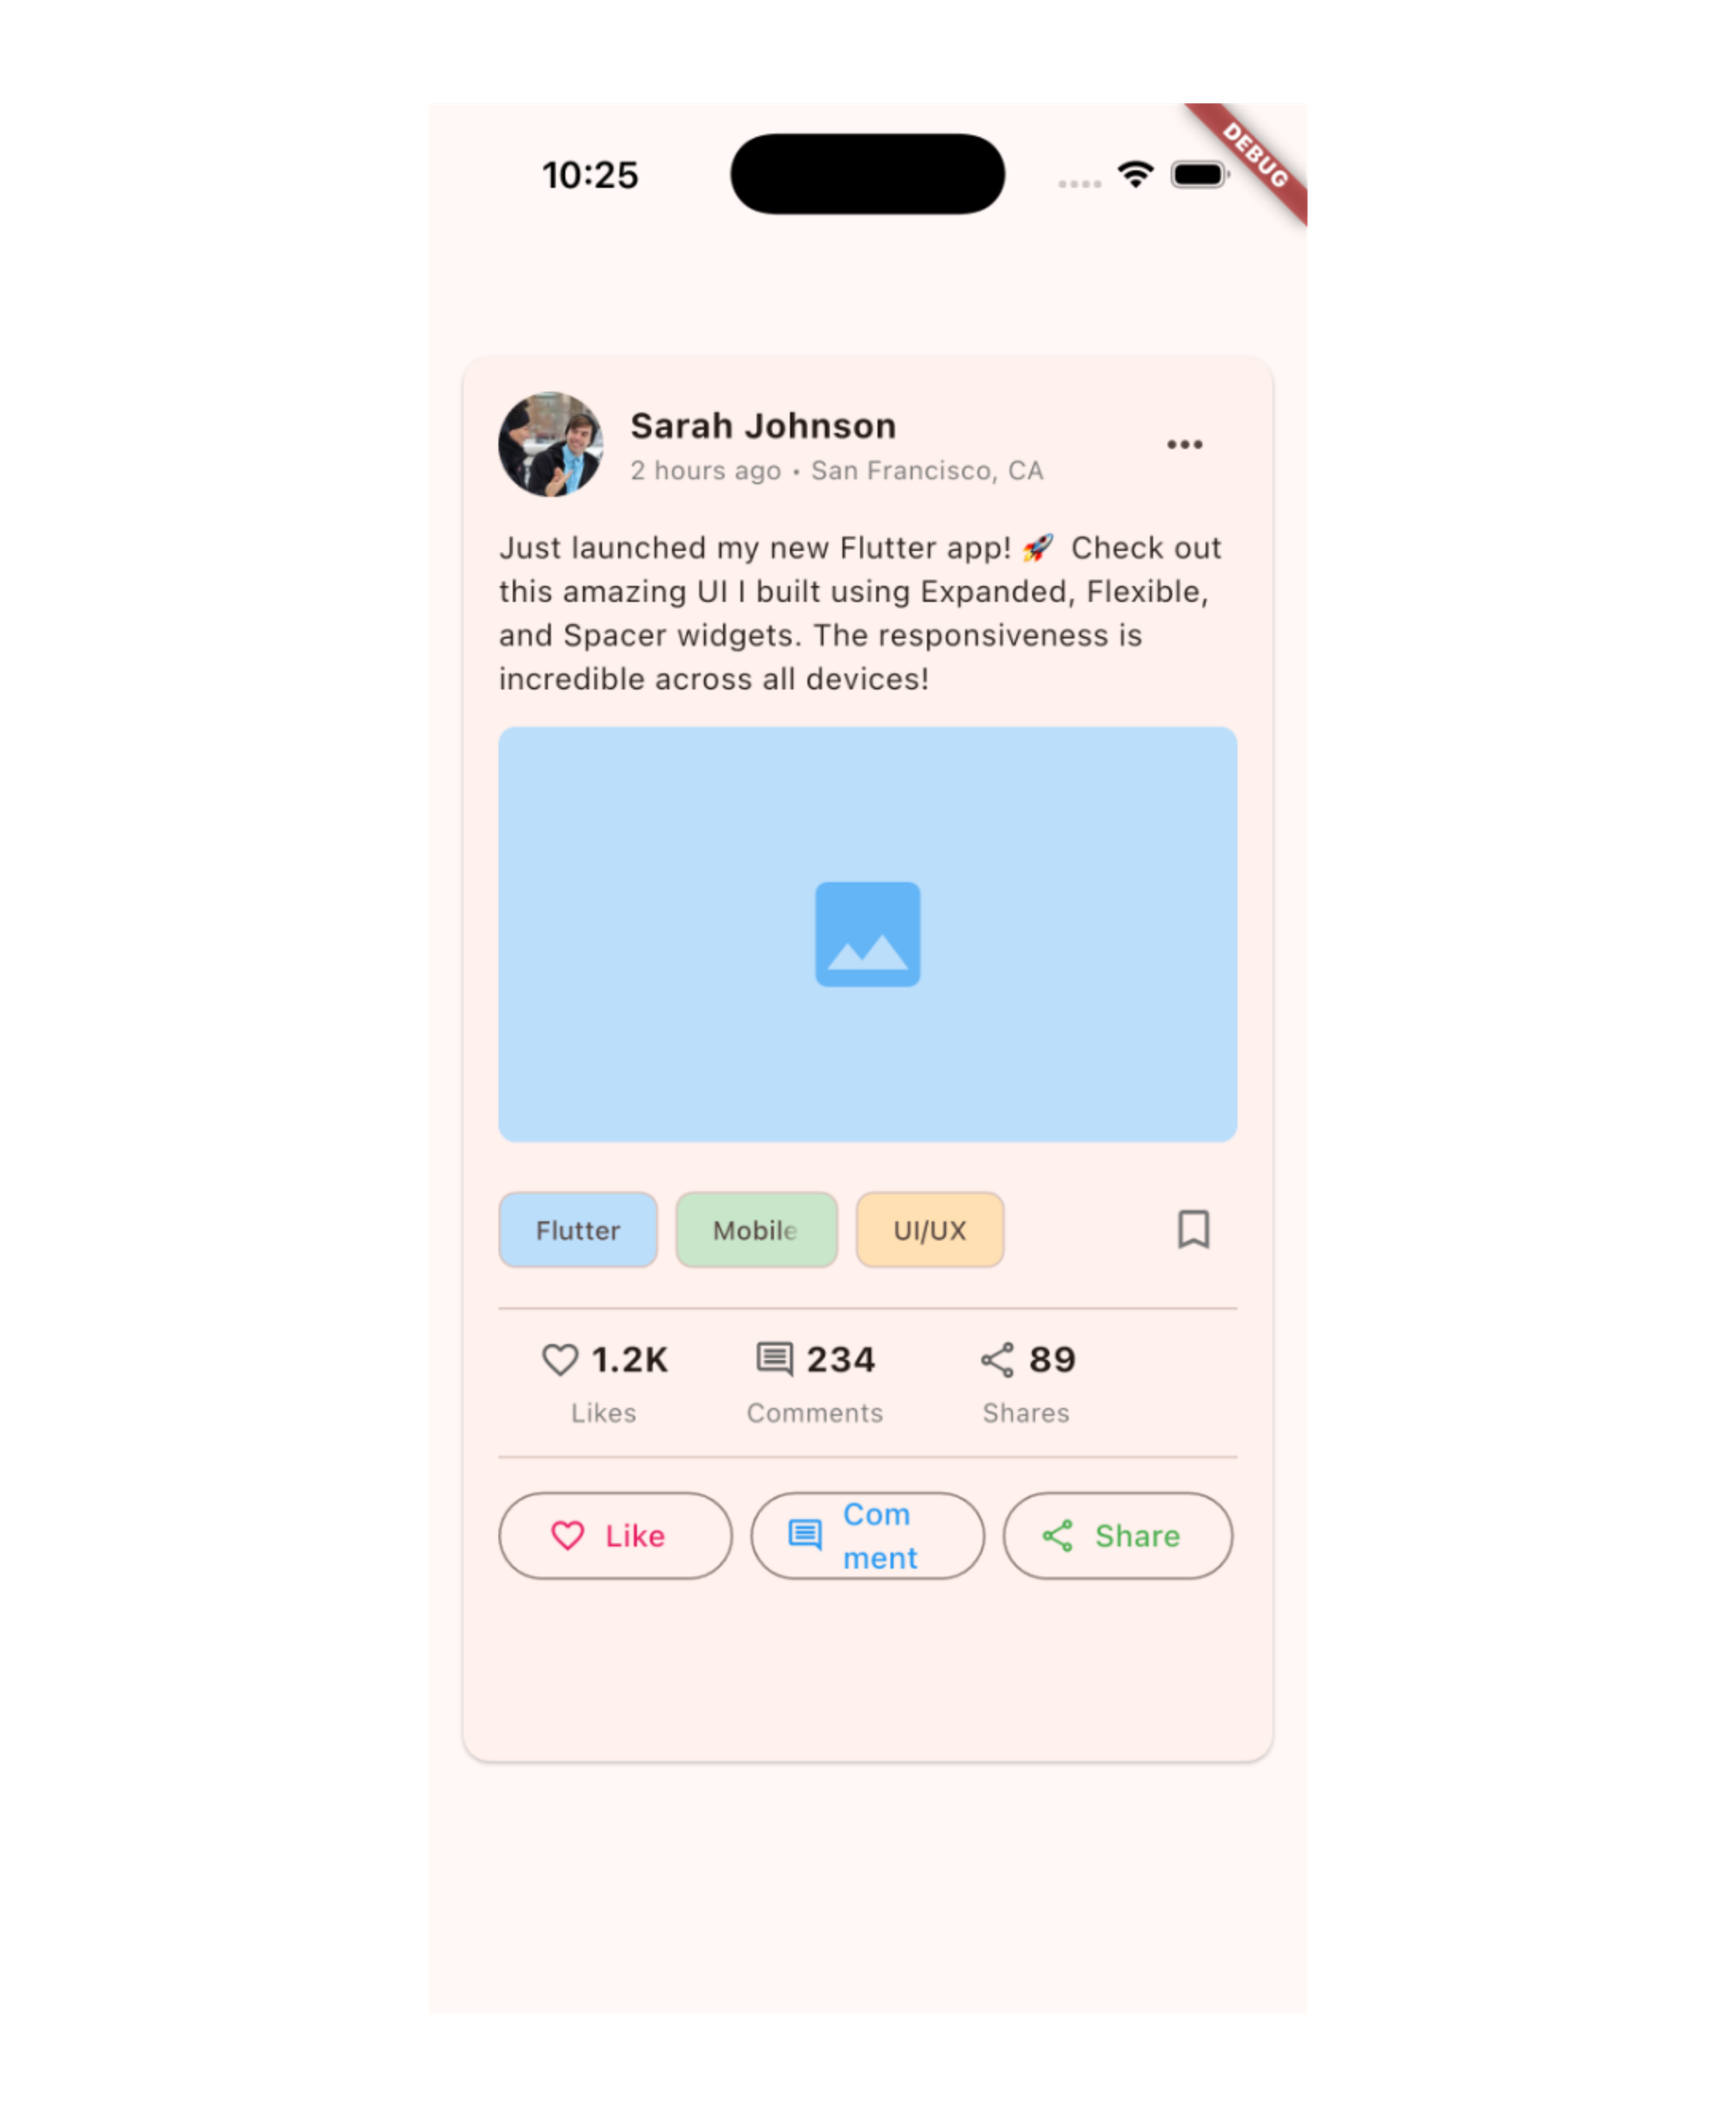
class SocialMediaPostCard extends StatelessWidget {
  const SocialMediaPostCard({super.key});

  @override
  Widget build(BuildContext context) {
    return Card(
      margin: EdgeInsets.all(16),
      child: Padding(
        padding: EdgeInsets.all(16),
        child: Column(
          crossAxisAlignment: CrossAxisAlignment.start,
          children: [
            Row(
              children: [
                CircleAvatar(
                  radius: 24,
                  backgroundImage: NetworkImage('https://i.pravatar.cc/150?img=1'),
                ),
                SizedBox(width: 12),

                Expanded(
                  child: Column(
                    crossAxisAlignment: CrossAxisAlignment.start,
                    children: [
                      Text(
                        'Sarah Johnson',
                        style: TextStyle(
                          fontWeight: FontWeight.bold,
                          fontSize: 16,
                        ),
                        overflow: TextOverflow.ellipsis,
                      ),
                      Text(
                        '2 hours ago • San Francisco, CA',
                        style: TextStyle(
                          color: Colors.grey[600],
                          fontSize: 12,
                        ),
                        overflow: TextOverflow.ellipsis,
                      ),
                    ],
                  ),
                ),

                IconButton(
                  icon: Icon(Icons.more_horiz),
                  onPressed: () {},
                ),
              ],
            ),

            SizedBox(height: 12),

            Text(
              'Just launched my new Flutter app! 🚀 Check out this amazing UI I built using Expanded, Flexible, and Spacer widgets. The responsiveness is incredible across all devices!',
              style: TextStyle(fontSize: 14),
            ),

            SizedBox(height: 12),

            ClipRRect(
              borderRadius: BorderRadius.circular(8),
              child: AspectRatio(
                aspectRatio: 16 / 9,
                child: Container(
                  color: Colors.blue[100],
                  child: Icon(Icons.image, size: 64, color: Colors.blue[300]),
                ),
              ),
            ),

            SizedBox(height: 16),

            Row(
              children: [
                Flexible(
                  child: Chip(
                    label: Text('Flutter'),
                    backgroundColor: Colors.blue[100],
                    labelStyle: TextStyle(fontSize: 12),
                  ),
                ),
                SizedBox(width: 8),
                Flexible(
                  child: Chip(
                    label: Text('Mobile Dev'),
                    backgroundColor: Colors.green[100],
                    labelStyle: TextStyle(fontSize: 12),
                  ),
                ),
                SizedBox(width: 8),
                Flexible(
                  child: Chip(
                    label: Text('UI/UX'),
                    backgroundColor: Colors.orange[100],
                    labelStyle: TextStyle(fontSize: 12),
                  ),
                ),
                Spacer(),
                Icon(Icons.bookmark_border, color: Colors.grey[600]),
              ],
            ),

            Divider(height: 24),

            Row(
              children: [
                Expanded(
                  flex: 2,
                  child: _StatItem(
                    icon: Icons.favorite_border,
                    count: '1.2K',
                    label: 'Likes',
                  ),
                ),
                Expanded(
                  flex: 2,
                  child: _StatItem(
                    icon: Icons.comment_outlined,
                    count: '234',
                    label: 'Comments',
                  ),
                ),
                Expanded(
                  flex: 2,
                  child: _StatItem(
                    icon: Icons.share_outlined,
                    count: '89',
                    label: 'Shares',
                  ),
                ),
                Spacer(flex: 1),
              ],
            ),

            Divider(height: 24),

            Row(
              children: [
                Expanded(
                  child: OutlinedButton.icon(
                    onPressed: () {},
                    icon: Icon(Icons.favorite_border, size: 18),
                    label: Text('Like'),
                    style: OutlinedButton.styleFrom(
                      foregroundColor: Colors.pink,
                    ),
                  ),
                ),
                SizedBox(width: 8),
                Expanded(
                  child: OutlinedButton.icon(
                    onPressed: () {},
                    icon: Icon(Icons.comment_outlined, size: 18),
                    label: Text('Comment'),
                    style: OutlinedButton.styleFrom(
                      foregroundColor: Colors.blue,
                    ),
                  ),
                ),
                SizedBox(width: 8),
                Flexible(
                  child: OutlinedButton.icon(
                    onPressed: () {},
                    icon: Icon(Icons.share_outlined, size: 18),
                    label: Text('Share'),
                    style: OutlinedButton.styleFrom(
                      foregroundColor: Colors.green,
                    ),
                  ),
                ),
              ],
            ),
          ],
        ),
      ),
    );
  }
}

class _StatItem extends StatelessWidget {
  final IconData icon;
  final String count;
  final String label;

  const _StatItem({
    required this.icon,
    required this.count,
    required this.label,
  });

  @override
  Widget build(BuildContext context) {
    return Column(
      children: [
        Row(
          mainAxisSize: MainAxisSize.min,
          children: [
            Icon(icon, size: 20, color: Colors.grey[700]),
            SizedBox(width: 4),
            Text(
              count,
              style: TextStyle(
                fontWeight: FontWeight.bold,
                fontSize: 16,
              ),
            ),
          ],
        ),
        SizedBox(height: 4),
        Text(
          label,
          style: TextStyle(
            color: Colors.grey[600],
            fontSize: 12,
          ),
        ),
      ],
    );
  }
}
ဒါကတော့ အခုထိ လေ့လာပြီးတဲ့ logic တွေနဲ့ ရေးထားတာပဲ ဖြစ်ပါတယ်။
ဒီနေ့ Day 19 အတွက်ကတော့ ဒီလောက်ပဲ ဖြစ်ပါတယ်။ အဆုံးထိ ဖတ်ပေးတဲ့အတွက် အများကြီး ကျေးဇူးတင်ပါတယ်။ နားမလည်တာတွေ အဆင်မပြေတာတွေ ရှိခဲ့ရင်လဲ အောက်မှာပေးထားတဲ့ discord server ထဲမှာ လာရောက်ဆွေးနွေးနိုင်ပါတယ်။ နောက်နေ့တွေမှာလဲ ဆက်လက်ပြီး sharing လုပ်သွားပေးသွားမှာ ဖြစ်တဲ့အတွက် subscribe လုပ်ထားဖို့ ဖိတ်ခေါ်ပါတယ်။
- Youtube: https://www.youtube.com/@arkarmintun
- Newsletter: https://arkar.dev/
- Discord: https://discord.gg/3xUJ6k6dkH