Day 22: TextFormFields & Form Validation.
Learn how to build professional Flutter forms with proper validation using Form widget, GlobalKey, and TextFormField. Master email validation, password strength checking, and real-time user feedback for production-ready apps.

မနေ့က user interaction တွေအကြောင်း ပြောရင်း Button တွေ TextField တွေအကြောင်း ပြောခဲ့ပြီးပြီဆိုတော့ ဒီနေ့တော့ နောက်ထပ် တဆင့်ဖြစ်တဲ့ Form နဲ့ ပတ်သက်တာတွေ ဆက်ပြီး ဆွေးနွေးပါမယ်။ တကယ့် production app တွေမှာ Form ဆိုတာ မပါမဖြစ်ပါ။ Login Form တွေ၊ Registration Form တွေ စသဖြင့် user input တွေ ထည့်တဲ့အခါ format တွေ မှန်အောင်၊ ထည့်တဲ့ data တွေ သတ်မှတ်ချက်တွေနဲ့ ကိုက်ညီအောင်လဲ validation တွေပါ တွဲလုပ်လို့ရပါတယ်။
Form & TextFormField
Form Widget - ဒါကိုတော့ form တခုလုံးကို ထိန်းချုပ်လို့ရမယ့် container တခုလို့ တွေးလို့ရပါတယ်။
Form(
key: _formKey,
child: Column(
children: [
// All your TextFormFields go here
],
),
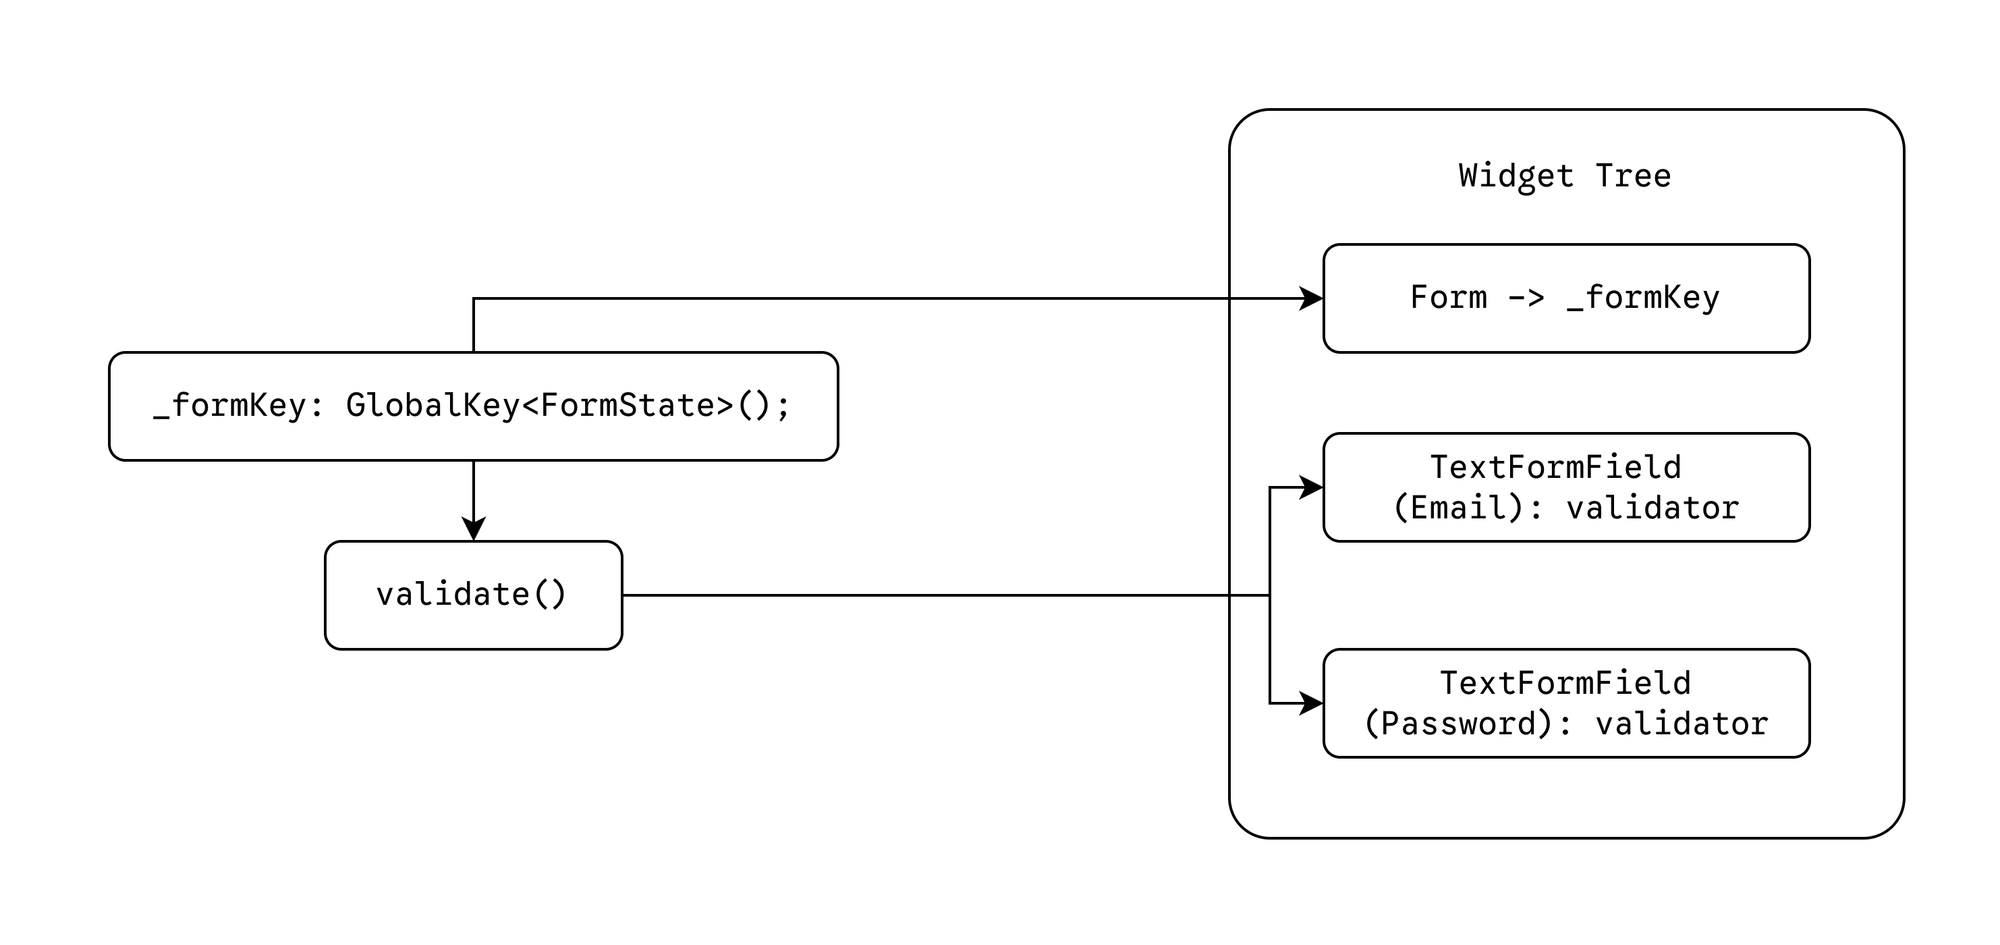
)GlobalKey<FormState> - ဒါကတော့ control panel လိုမျိုး မြင်ကြည့်လို့ရပါတယ်။ form ထဲမှာ ရှိတဲ့ value တွေကို validate လုပ်ချင်တဲ့အခါ သုံးလို့ရပါတယ်။
final _formKey = GlobalKey<FormState>();// Validate ALL fields at once
_formKey.currentState!.validate()
// Save ALL field values
_formKey.currentState!.save()
// Reset ALL fields to initial state
_formKey.currentState!.reset()TextFormField - ဒါကတော့ input တွေ ရိုက်ထည့်လို့ရမယ့် field တခုဖြစ်ပြီး TextField နဲ့မတူတာကတော့ validator property ပါတာပဲ ဖြစ်ပါတယ်။
TextFormField(
  decoration: InputDecoration(labelText: 'Email'),
  validator: (value) {
    if (value == null || value.isEmpty) {
      return 'Email is required';
    }
    if (!value.contains('@')) {
      return 'Please enter a valid email';
    }
    return null; // No error = valid!
  },
)
ဒါဆိုရင်တော့ ဒါတွေသုံးပြီး Login form တခု ဆောက်ကြည့်ရအောင်ပါ။
import 'package:flutter/material.dart';

class FormSample extends StatefulWidget {
  const FormSample({super.key});

  @override
  State<FormSample> createState() => _FormSampleState();
}

class _FormSampleState extends State<FormSample> {
  final _formKey = GlobalKey<FormState>();
  final _emailController = TextEditingController();
  final _passwordController = TextEditingController();

  @override
  void dispose() {
    _emailController.dispose();
    _passwordController.dispose();
    super.dispose();
  }

  void _submit() {
    final isValid = _formKey.currentState?.validate() ?? false;
    if (isValid) {
      ScaffoldMessenger.of(context).showSnackBar(
        SnackBar(
          content: Text(
            'Processing Data: ${_emailController.text}, ${_passwordController.text}...',
          ),
        ),
      );
    }
  }

  @override
  Widget build(BuildContext context) {
    return Center(
      child: Form(
        key: _formKey,
        autovalidateMode: .onUserInteraction,
        child: Padding(
          padding: const EdgeInsets.all(20.0),
          child: Column(
            mainAxisSize: .min,
            children: [
              TextFormField(
                controller: _emailController,
                decoration: InputDecoration(
                  labelText: 'Email',
                  border: OutlineInputBorder(),
                ),
                validator: (value) {
                  if (value == null || !value.contains('@')) {
                    return 'Enter a valid email';
                  }
                  return null;
                },
              ),
              const SizedBox(height: 30),
              TextFormField(
                controller: _passwordController,
                obscureText: true,
                decoration: InputDecoration(
                  labelText: 'Password',
                  border: OutlineInputBorder(),
                ),
                validator: (value) {
                  if (value == null || value.length < 6) {
                    return 'Password too short';
                  }
                  return null;
                },
              ),
              const SizedBox(height: 30),
              ElevatedButton(onPressed: _submit, child: const Text("Login")),
            ],
          ),
        ),
      ),
    );
  }
}
ဒီမှာ ကြည့်မယ်ဆို Form widget ကို တွေ့ရမှာဖြစ်ပြီး key နေရာမှာ _formKey ကို ထည့်ပေးထားပါတယ်။ အခုလိုမျိုး GlobalKey နဲ့ ချိတ်ပေးခြင်းအားဖြင့် widget တွေကို build method အောက်မှာ ရှိတဲ့ widget tree ထဲကတင်မက အခြားသော function တွေဖြစ်တဲ့ _submit လိုမျိး function တွေထဲကပါ လှမ်းပြီးတော့ reference လုပ်လို့ရသွားပါတယ်။ ဒီမှာ reference လုပ်ဖို့ လိုရခြင်းကတော့ form ရဲ့ validate function ကို ခေါ်ဖို့ ဖြစ်ပြီးတော့ validate ကို ခေါ်လိုက်တဲ့အခါ Form အောက်မှာရှိတဲ့ TextFormField တွေရဲ့ validator function တွေကို သွားပြီးတော့ ခေါ်ပေးပါတယ်။
Form ထဲမှာ autovalidateMode ဆိုတဲ့ property ပါပါတယ်။ သူ့ကိုတော့ form validation ကို ဘယ်အချိန်မှာ trigger လုပ်မလဲဆိုတာ သတ်မှတ်ပေးတာပဲ ဖြစ်ပါတယ်။
AutovalidateMode
always- user action ရှိရှိ မရှိရှိ validate လုပ်ပါတယ်။disabled- auto validation ဘယ်တော့မှ မလုပ်ဖို့ သတ်မှတ်ထားတာ ဖြစ်ပါတယ်။onUnfocus- user input တခုကနေ နောက်တခုကို သွားတဲ့အချိန်မှာ focus မဖြစ်တော့တဲ့ input ရဲ့ validate ကို ခေါ်ပါတယ်။onUserInteraction- user က form ထဲက input တခုခုထဲ စာတွေဘာတွေ ရိုက်လိုက်တဲ့အခါ form တခုလုံးရဲ့ validate ကို ခေါ်ပါတယ်။
Validator
Validator ထဲမှာ ပိုပြီး complex ဖြစ်တဲ့ validation တွေလဲ တည်ဆောက်လို့ရပါတယ်။
String? validatePassword(String? value) {
  if (value == null || value.isEmpty) {
    return 'Password is required';
  }

  if (value.length < 8) {
    return 'Password must be at least 8 characters';
  }

  // Check for uppercase
  if (!value.contains(RegExp(r'[A-Z]'))) {
    return 'Password must contain an uppercase letter';
  }

  // Check for lowercase
  if (!value.contains(RegExp(r'[a-z]'))) {
    return 'Password must contain a lowercase letter';
  }

  // Check for number
  if (!value.contains(RegExp(r'[0-9]'))) {
    return 'Password must contain a number';
  }

  // Check for special character
  if (!value.contains(RegExp(r'[!@#$%^&*(),.?":{}|<>]'))) {
    return 'Password must contain a special character';
  }

  return null; // All checks passed!
}| Feature | TextField | TextFormField |
|---|---|---|
| Integration | Standalone | Works inside Form |
| Validation | Manual logic required | Built-in validator |
| Best Use | Search bars, Simple notes | User registration, login, checkout |
ဒါဆိုရင်တော့ Flutter မှာ Form တခုကို ဘယ်လို တည်ဆောက်ပြီး validation တွေအတွက် ဘယ်လို လုပ်လို့ရမလဲဆိုတာ ရှင်းသွားလောက်ပြီ ထင်ပါတယ်။
ဒီနေ့ Day 22 အတွက်ကတော့ ဒီလောက်ပဲ ဖြစ်ပါတယ်။ အဆုံးထိ ဖတ်ပေးတဲ့အတွက် အများကြီး ကျေးဇူးတင်ပါတယ်။ နားမလည်တာတွေ အဆင်မပြေတာတွေ ရှိခဲ့ရင်လဲ အောက်မှာပေးထားတဲ့ discord server ထဲမှာ လာရောက်ဆွေးနွေးနိုင်ပါတယ်။ နောက်နေ့တွေမှာလဲ ဆက်လက်ပြီး sharing လုပ်သွားပေးသွားမှာ ဖြစ်တဲ့အတွက် subscribe လုပ်ထားဖို့ ဖိတ်ခေါ်ပါတယ်။
- Youtube: https://www.youtube.com/@arkarmintun
- Newsletter: https://arkar.dev/
- Discord: https://discord.gg/3xUJ6k6dkH