Test-Driven Development in React Native - Part 4

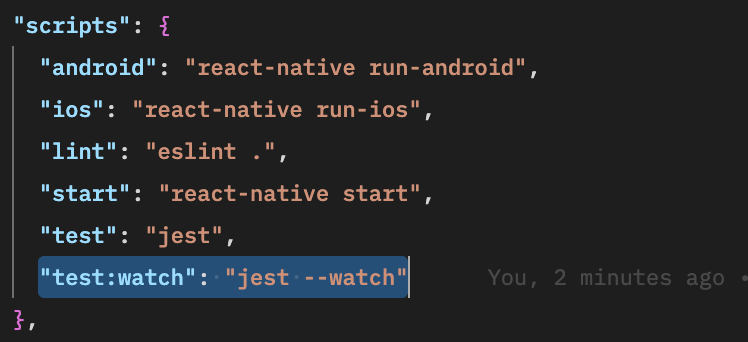
ကျွန်တော်တို့တွေ component တွေရေးတဲ့အချိန်မှာ တခါရေးတိုင်းတခါ npm run test ဆိုပြီး test တွေကို ထပ်ထပ်ပြီး terminal မှာ run နေရတာ အချိန်ကုန်ပါတယ်။ ဒီတော့ ကျွန်တော်တို့ တခါ run ထားပြီး file တွေမှာ အပြောင်းအလဲရှိတိုင်း auto ပြန်ပြီး test တွေ run အောင် ပြင်ဆင်လိုက်ပါမယ်။ ဒီအတွက် package.json ရဲ့ scripts တွေထဲမှာ test:watch ဆိုပြီး ထည့်လိုက်ပါမယ်။
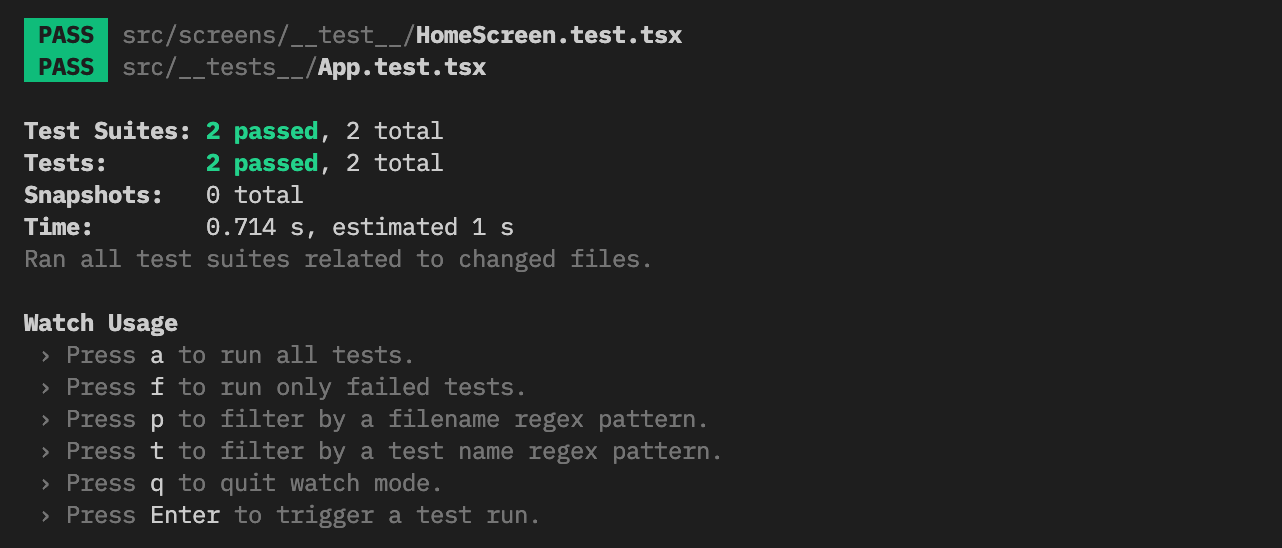
ပြီးရင်တော့ terminal မှာ npm run test:watch ဆိုပြီး run လိုက်ပြီဆိုတာနဲ့ test တွေကို run ပြီးတော့ အခုပြထားသလို မြင်နေရမှာပဲ ဖြစ်ပါတယ်။
အပေါ်မှာ ပြထားသလို မြင်နေရပြီဆို file တွေအပြောင်းအလဲ ရှိတာနဲ့ test တွေကို ပြန်ပြီး run ပေးနေမှာပဲ ဖြစ်ပါတယ်။ တကယ်လို့ ထပ်ပြီး run စေချင်တဲ့အခါမှာလဲ a, f စသဖြင့် command တွေကို နှိပ်ပြီးတော့ run လို့ရပါတယ်။
React Navigation
ကျွန်တော်တို့ app မှာ screen တခုထက်ပိုပြီး ပါဝင်သွားမှာဖြစ်ပါတယ်။ ဒီတော့ screen တခုက တခု အကူးအပြောင်း navigation အတွက် react navigation ကို အသုံးပြုပါမယ်။ လိုအပ်တဲ့ setup တွေကို ဒီမှာ ပြထားတဲ့အတိုင်း လုပ်သွားလို့ရပါတယ်။


အပေါ်မှာ ပြထားတာတွေအပြင် ကျွန်တော်တို့ react-native-reanimated နဲ့ react-native-gesture-handler တွေကိုလဲ သွင်းထားပါမယ်။ react navigation မှာ ပြထားတဲ့ test script မှာ အဲ့ဒီ library တွေကို test တဲ့ test script ပါဝင်နေတဲ့အတွက် တခါထဲသွင်းထားတာပဲ ဖြစ်ပါတယ်။ ဒီနှစ်ခုအပြင် Android နဲ့ iOS မှာ navigation stack ကို manage လုပ်ဖို့ရာ အသုံးပြုမယ့် @react-navigation/native-stack ကိုလဲသွင်းထားပါမယ်။
yarn add react-native-reanimated react-native-gesture-handler @react-navigation/native-stack အောက်မှာပြထားတာကို jest/setup.js ဆိုတဲ့ folder ထဲမှာ ရေးလိုက်ရပါမယ်။ ဒါကတော့ react navigation မှာပေးထားတဲ့ jest test script ပဲ ဖြစ်ပါတယ်။
/* eslint-disable no-undef */

// include this line for mocking react-native-gesture-handler
import 'react-native-gesture-handler/jestSetup';

// include this section and the NativeAnimatedHelper section for mocking react-native-reanimated
jest.mock('react-native-reanimated', () => {
  const Reanimated = require('react-native-reanimated/mock');

  // The mock for `call` immediately calls the callback which is incorrect
  // So we override it with a no-op
  Reanimated.default.call = () => {};

  return Reanimated;
});

// Silence the warning: Animated: `useNativeDriver` is not supported because the native animated module is missing
jest.mock('react-native/Libraries/Animated/NativeAnimatedHelper');
jest/setup.js
ဒါပြီးရင်တော့ ကျွန်တော်တို့တွေ App.tsx မှာစပြီးတော့ navigation နဲ့ပတ်သက်တာတွေ စပြီးတော့ ရေးလို့ရပါပြီ။ အရင်ဆုံး App.test.tsx မှာ ကျွန်တော်တို့ ပြင်စရာလေးတွေ ရှိပါတယ်။ အခုက ကျွန်တော်တို့ App.tsx က screen တခုအနေနဲ့မဟုတ်တော့ဘဲ navigation root အနေနဲ့ အလုပ်လုပ်သွားမှာဖြစ်တဲ့အတွက် test ရေးထားတာကို အခုလိုပဲ ပြင်ရေးလိုက်ပါမယ်။
import React from 'react';
import {describe, test} from '@jest/globals';
import {render} from '@testing-library/react-native';
import App from '../App';

describe('App', () => {
  test('should render correctly', () => {
    const screen = render(<App />);
    screen.getByTestId('home-screen');
  });
});
src/__test__/App.test.tsx
အခုအချိန်မှာ test fail ဖြစ်နေမှာပဲ ဖြစ်ပါတယ်။ အစက test id app ကို စစ်ထားရာကနေ home-screen ဆိုပြီး ပြောင်းလဲလိုက်လို့ပဲဖြစ်ပါတယ်။ ဒီတော့ ကျွန်တော်တို့တွေ navigation ကိုစပြီးတော့ setup လုပ်ပါမယ်။ App.tsx ကိုလဲ အခုလိုပဲ ပြောင်းလဲလိုက်ပါမယ်။
import {NavigationContainer} from '@react-navigation/native';
import {createNativeStackNavigator} from '@react-navigation/native-stack';
import React from 'react';
import {Screens} from './screens';
import HomeScreen from './screens/HomeScreen';

type RootStackParamsList = {
  [Screens.HomeScreen]: undefined;
};

const RootStack = createNativeStackNavigator<RootStackParamsList>();

const App = () => {
  return (
    <NavigationContainer>
      <RootStack.Navigator>
        <RootStack.Screen name={Screens.HomeScreen} component={HomeScreen} />
      </RootStack.Navigator>
    </NavigationContainer>
  );
};

export default App;
src/App.tsx
အခုလို ပြောင်းရေးလိုက်တဲ့အချိန်မှာ အောက်မှာပြထားသလိုမျိုး error တက်လာပါလိမ့်မယ်။ ဒါကတော့ react navigation ကို jest ကနေပြီး သွားပြီးတော့ parse လုပ်လို့မရလို့ပဲဖြစ်ပါတယ်။
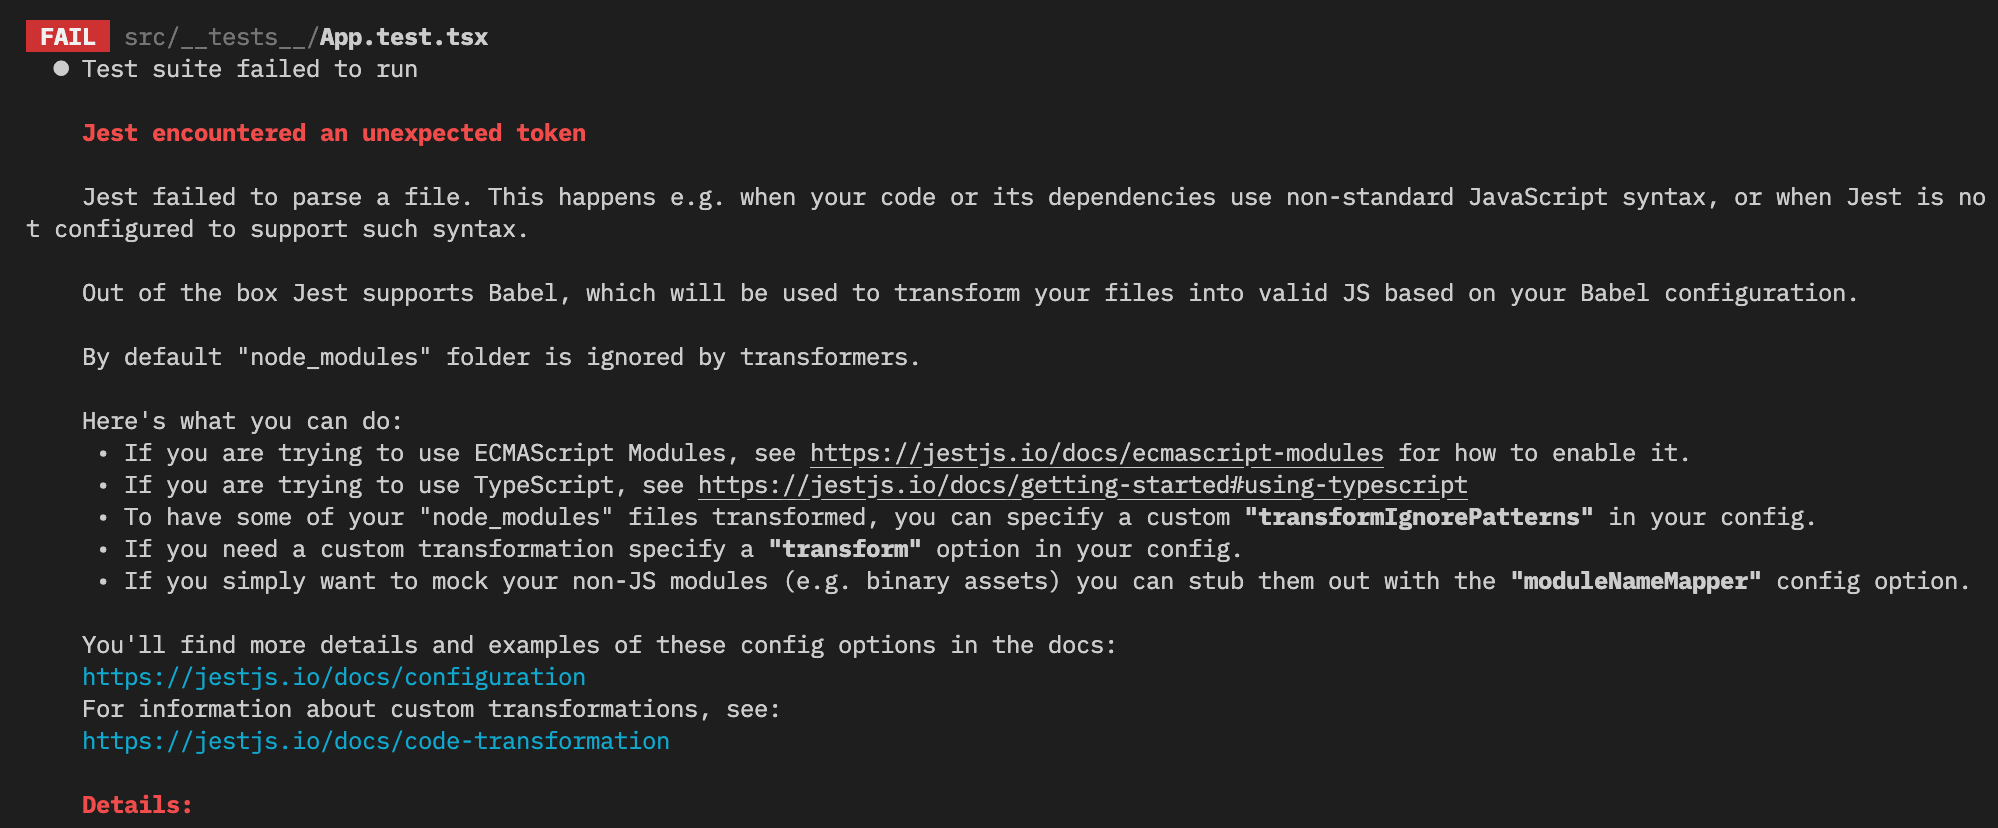
ဒါကို ဖြေရှင်းဖို့ဆို ကျွန်တော်တို့ jest ကို ဘယ်လို file တွေကို transform မလုပ်ဘူးလဲဆိုတာ သတ်မှတ်ထားဖို့ လိုပါမယ်။ ဒီတော့ jest.config.js ကို အခုလိုပဲ update လုပ်လိုက်ပါမယ်။
module.exports = {
  preset: 'react-native',
  setupFiles: ['./jest/setup.js'],
  moduleFileExtensions: ['ts', 'tsx', 'js', 'jsx', 'json', 'node'],
  transformIgnorePatterns: [
    'node_modules/(?!(jest-)?@react-native|react-native|@react-native-community|@react-navigation)',
  ],
};
jest.config.js
အခုလို ပြင်ပြီးရင်တော့ jest watch လုပ်ထားတာကို ရပ်ပြီး ပြန် run ပေးဖို့ လိုပါမယ်။ terminal မှာ q ကို နှိပ်ပြီး quit လုပ်လို့ရသလို Command + C or Ctrl + C နဲ့လဲ ရပ်လို့ရပါတယ်။
ပြန်ပြီးတော့ npm run test:watch ကို run လိုက်တဲ့အခါမှာတော့ အခုလိုမျိုး ပြန်စိမ်းနေပါလိမ့်မယ်။