Day 25: Pixly Kickoff - Project Setup & Material 3 Theme
Start Pixly, a real photo discovery app powered by the Pexels API. Set up the project with FVM, plan a clean folder structure, and build a Material 3 theme with ColorScheme.fromSeed and a custom ThemeExtension.

ဒီနေ့ကစပြီး widget တခုချင်းစီကို သီးသန့် လေ့လာနေတာကနေ တကယ့် app တခုကို အစကနေ အဆုံးထိ တည်ဆောက်တဲ့ အပိုင်းကို ရောက်လာပါပြီ။ Day 25 ကနေ Day 40 အထိ ရက် ၁၆ ရက်လုံး Pixly ဆိုတဲ့ photo discovery app တခုကို တည်ဆောက်သွားမှာပဲ ဖြစ်ပါတယ်။ ရှေ့ရက်တွေမှာ လေ့လာခဲ့တဲ့ Dart, Widget, Layout, ListView, GridView တွေ အားလုံးကို တကယ့် app ထဲမှာ ဘယ်လို ပေါင်းသုံးကြလဲဆိုတာ မြင်ရမှာ ဖြစ်ပြီး Navigation, Networking, State management, Local storage လိုမျိုး အသစ်တွေကိုလဲ လိုအပ်လာတဲ့ အချိန်မှာ တခါတည်း လေ့လာသွားမှာပါ။
Pixly ဆိုတာ ဘာလဲ?
Pixly က Pexels ရဲ့ အခမဲ့ API ကို သုံးပြီး ဓာတ်ပုံလှလှလေးတွေကို ရှာဖွေ ကြည့်ရှုနိုင်တဲ့ app ပဲ ဖြစ်ပါတယ်။ Project ပြီးသွားတဲ့အခါ အောက်က feature တွေ ပါဝင်မှာ ဖြစ်ပါတယ်။
- Curated photos တွေကို grid ပုံစံနဲ့ ပြခြင်း (Day 24 က GridView ကို ပြန်သုံးမှာပါ)
- Scroll ဆွဲရင်း နောက်ထပ် ပုံတွေ ဆက် load လုပ်ပေးတဲ့ infinite scroll နဲ့ pull-to-refresh
- Photo detail screen နဲ့ Hero animation
- Debounce လုပ်ထားတဲ့ search
- Bookmark လုပ်ထားတာတွေကို device ထဲမှာ သိမ်းထားခြင်း
- Dark mode
- Phone, tablet နှစ်မျိုးလုံးမှာ ကြည့်ကောင်းအောင် adaptive layout
ဘာလို့ Pexels API လဲ?
ဓာတ်ပုံ API အမျိုးမျိုး (Dribbble, Behance, Unsplash, Pexels) ကို ချိန်ထိုးကြည့်ပြီး Pexels ကို ရွေးလိုက်တာ ဖြစ်ပါတယ်။ Pexels API က အခမဲ့ API key ရယူပြီး တန်းသုံးလို့ ရပါတယ်။ ဒါပေမယ့် သတိထားရမယ့် စည်းကမ်းတချို့ ရှိပါတယ်။
- Default အနေနဲ့ တနာရီ request 200 ကြိမ်၊ တလ request 20,000 ကြိမ်အထိပဲ ခေါ်ခွင့်ရှိပါတယ်။
- API ကို သုံးတဲ့ app မှာ Pexels ကို link ပြထားဖို့နဲ့ ဖြစ်နိုင်ရင် ဓာတ်ပုံရိုက်တဲ့သူ (photographer) ကို credit ပေးဖို့ Pexels က တောင်းဆိုထားပါတယ်။
- Pexels ရဲ့ core functionality ကို ကူးယူထားတဲ့ (Pexels နဲ့ အပြိုင် ဖြစ်နေတဲ့) app မျိုး မလုပ်ရဘူးလို့လဲ guideline မှာ ပါပါတယ်။
ဒီ အချက်တွေကို Pixly မှာ ထည့်သွင်း စဥ်းစားပြီး တည်ဆောက်သွားမှာ ဖြစ်ပါတယ်။ Pixly က လေ့လာဖို့ ရည်ရွယ်တဲ့ project ဖြစ်ပါတယ်။ ဒီ API နဲ့ app တခုကို Store ပေါ် တကယ်တင်မယ်ဆိုရင်တော့ Pexels ရဲ့ API guidelines ကို အပြည့်အစုံ ဖတ်ပြီး ကိုယ့် app က ခွင့်ပြုထားတဲ့ အသုံးပြုပုံ ဟုတ်မဟုတ် အရင် စစ်ဆေးဖို့ လိုပါတယ်။ API key ယူတာကိုတော့ Day 27 မှာ ဆက်ကြည့်ပါမယ်။
နောက် ရက် ၁၅ ရက်အတွက် Plan
| Day | ခေါင်းစဥ် |
|---|---|
| 25 | Project setup & Material 3 theme |
| 26 | Assets, SVGs & custom fonts |
| 27 | Pexels API, .env & data models |
| 28 | API client with Dio |
| 29 | State management with Provider |
| 30 | Photo grid, image caching & shimmer |
| 31 | Infinite scroll & pull-to-refresh |
| 32 | Navigation & Hero animations |
| 33 | GoRouter & bottom navigation |
| 34 | Search with debouncing |
| 35 | Bookmarks with SharedPreferences |
| 36 | Dark mode |
| 37 | Slivers & CustomScrollView |
| 38 | Adaptive layouts |
| 39 | Errors, empty states & attribution |
| 40 | Wrap-up & what's next |
Project Setup
Day 1 မှာ FVM (Flutter Version Management) နဲ့ Flutter version တွေကို စီမံတာ ပြောခဲ့ဖူးပါတယ်။ ဒီ project ကိုလဲ FVM နဲ့ပဲ ဖန်တီးသွားပါမယ်။ ဒီ series မှာ သုံးမယ့် version ကတော့ Flutter 3.47.5 ဖြစ်ပါတယ်။
fvm install 3.47.5
fvm spawn 3.47.5 create pixly
cd pixly
fvm use 3.47.5
fvm install 3.47.5- ဒီ version ကို မသွင်းရသေးရင် download လုပ်ပေးပါတယ်။ သွင်းပြီးသားဆိုရင် ကျော်လို့ရပါတယ်။fvm spawn 3.47.5 create pixly-flutter create pixlyကို Flutter 3.47.5 နဲ့ run ပေးတာပါ။ ဒါမှ project template ကလဲ ကိုယ်သုံးမယ့် version အတိုင်း ထွက်လာမှာ ဖြစ်ပါတယ်။fvm use 3.47.5- project folder ထဲမှာ run လိုက်တဲ့အခါ.fvmrcfile ထဲမှာ ဒီ project က ဘယ် Flutter version ကို သုံးလဲဆိုတာ မှတ်ထားပေးပါတယ်။ ဒါကြောင့် team ထဲက ဘယ်သူ clone လုပ်လုပ် Flutter version တူတူနဲ့ run နိုင်မှာ ဖြစ်ပါတယ်။
ဒီနောက်ပိုင်း project ကို run ဖို့၊ package တွေ ထည့်ဖို့ အမြဲ fvm flutter ... ဆိုပြီး ရှေ့က fvm ခံပြီး ခေါ်ပေးရပါမယ်။
Folder Structure
flutter create က lib/main.dart တခုတည်းပဲ ပေးပါတယ်။ app ကြီးလာတဲ့အခါ file တွေ ဟိုရောက်ဒီရောက် မဖြစ်အောင် အစကတည်းက folder တွေ ခွဲထားပါမယ်။
lib/
├── config/       # theme, constants, asset paths, env
├── core/         # API client, storage service (Day 28 နောက်ပိုင်း)
├── models/       # Photo, PhotosPage စတဲ့ data class တွေ
├── providers/    # state management (Day 29 နောက်ပိုင်း)
├── screens/      # screen တခုချင်းစီ
├── widgets/      # ပြန်သုံးလို့ရတဲ့ widget တွေ
└── main.dart
ဒီနေ့မှာတော့ config/ နဲ့ screens/ ကိုပဲ စသုံးပါမယ်။ ကျန်တဲ့ folder တွေကို လိုအပ်လာတဲ့ ရက်မှာ ထပ်ဖြည့်သွားမှာ ဖြစ်ပါတယ်။
// lib/config/constants.dart
class AppConstants {
  static const String appName = 'Pixly';
}
App name လိုမျိုး နေရာအများကြီးမှာ သုံးမယ့် တန်ဖိုးတွေကို တနေရာတည်းမှာ စုထားခြင်းအားဖြင့် ပြင်ချင်တဲ့အခါ တနေရာတည်းမှာ ပြင်ရုံပါပဲ။
Material 3 Theme
App တခုရဲ့ အရောင်တွေကို widget တခုချင်းစီမှာ Colors.blue လို တိုက်ရိုက် ရေးနေမယ်ဆိုရင် dark mode ထည့်ချင်တဲ့အခါ ဒါမှမဟုတ် brand color ပြောင်းချင်တဲ့အခါ နေရာတိုင်း လိုက်ပြင်ရမှာပါ။ ဒါကြောင့် အရောင်တွေကို ThemeData ထဲမှာ တနေရာတည်း သတ်မှတ်ပြီး widget တွေကနေ Theme.of(context) နဲ့ ပြန်ယူသုံးတာက Flutter မှာ အကောင်းဆုံး နည်းလမ်းပဲ ဖြစ်ပါတယ်။
Flutter 3.16 ကစပြီး Material 3 က default ဖြစ်လာပါပြီ။ Material 3 မှာ အရောင်တခုချင်းစီကို ကိုယ်တိုင် ရွေးနေစရာ မလိုတော့ပါဘူး။ seed color အရောင်တခုပဲ ပေးလိုက်ရင် ColorScheme.fromSeed က အဲ့ဒီ အရောင်ကနေ primary, secondary, surface, primaryContainer စတဲ့ အရောင် set တခုလုံးကို light/dark နှစ်မျိုးလုံးအတွက် ထုတ်ပေးပါတယ်။
// lib/config/theme.dart
import 'package:flutter/material.dart';

class AppTheme {
  static const Color seedColor = Color(0xFF05A081);

  static ThemeData get lightTheme => _build(Brightness.light);
  static ThemeData get darkTheme => _build(Brightness.dark);

  static ThemeData _build(Brightness brightness) {
    final colorScheme = ColorScheme.fromSeed(
      seedColor: seedColor,
      brightness: brightness,
    );

    final base = ThemeData(colorScheme: colorScheme);

    return base.copyWith(
      textTheme: base.textTheme.copyWith(
        titleLarge: base.textTheme.titleLarge?.copyWith(fontWeight: .bold),
      ),
      appBarTheme: AppBarTheme(
        centerTitle: false,
        backgroundColor: colorScheme.surface,
        foregroundColor: colorScheme.onSurface,
      ),
      cardTheme: CardThemeData(
        elevation: 0,
        clipBehavior: .antiAlias,
        shape: RoundedRectangleBorder(borderRadius: BorderRadius.circular(16)),
      ),
      extensions: [
        brightness == Brightness.light ? PixlyColors.light : PixlyColors.dark,
      ],
    );
  }
}
ဒီမှာ _build function တခုတည်းကနေ brightness ပဲ ပြောင်းပြီး light theme နဲ့ dark theme နှစ်ခုလုံး ထုတ်ထားတာ ဖြစ်ပါတယ်။ ဒီလိုလုပ်ခြင်းအားဖြင့် AppBar ပုံစံ၊ Card ပုံစံ စတဲ့ setting တွေကို theme နှစ်ခုလုံးအတွက် နှစ်ခါ ရေးစရာ မလိုတော့ပါဘူး။
base-colorSchemeကို ထည့်ပြီး ThemeData အခြေခံ တခု အရင် ဆောက်ထားတာ ဖြစ်ပါတယ်။ ပြီးမှcopyWithနဲ့ ကိုယ်ပြောင်းချင်တဲ့ အပိုင်းတွေကိုပဲ အစားထိုးပါတယ်။textTheme- Material 3 ရဲ့ text style set ထဲကtitleLargeကို bold ပြောင်းထားပါတယ်။ Material 3 မှာ AppBar ရဲ့ title က default အနေနဲ့titleLargeကို သုံးတဲ့အတွက် AppBar title တွေ bold ဖြစ်သွားမှာပါ။ AppBar ထဲမှာtitleTextStyle: TextStyle(fontSize: 22, ...)လို့ style အသစ် ဆောက်ပြီး ထည့်ရင်လဲ ရပေမယ့် အဲ့ဒီ style က theme ရဲ့ font family ကို မယူတော့တဲ့အတွက် နောက်နေ့မှာ custom font ထည့်တဲ့အခါ AppBar title တခုတည်း font မပြောင်းဘဲ ကျန်နေမှာ ဖြစ်ပါတယ်။ ဒါကြောင့် text theme ကနေပဲ ပြောင်းလိုက်တာ ပိုကောင်းပါတယ်။appBarTheme- app ထဲက AppBar အားလုံးရဲ့ default ပုံစံ (title ကို ဘယ်ဘက်ကပ်၊ background နဲ့ စာအရောင်)cardTheme- Card အားလုံးကို ထောင့်ဝိုင်း 16 နဲ့ shadow မပါတဲ့ ပုံစံ (Day 24 က product card တွေမှာclipBehavior: .antiAliasကို card တိုင်းမှာ ရေးခဲ့ရပေမယ့် ဒီမှာ theme ထဲမှာ တခါတည်း သတ်မှတ်ထားလိုက်ပါပြီ)extensions- ဒါကတော့ အောက်မှာ ဆက်ပြောမယ့် ကိုယ်ပိုင် theme value တွေ ဖြစ်ပါတယ်
ThemeExtension - ကိုယ်ပိုင် Theme Values
ColorScheme ထဲမှာ primary, surface, error လိုမျိုး Material ရဲ့ အရောင် slot တွေပဲ ပါပါတယ်။ ဒါပေမယ့် Pixly မှာ Material မှာ မပါတဲ့ အရောင်တွေ လိုအပ်လာပါတယ်။ ဥပမာ ပုံတွေ load မပြီးခင် ပြမယ့် shimmer (skeleton) loading ရဲ့ အရောင်နဲ့ ဓာတ်ပုံပေါ်မှာ စာအဖြူ ရေးတဲ့အခါ ဖတ်ရလွယ်အောင် ခံထားမယ့် overlay အရောင်တွေပါ။ ဒီအရောင်တွေကလဲ light mode နဲ့ dark mode မှာ မတူကြပါဘူး။
ဒီလိုမျိုး ကိုယ်ပိုင် theme value တွေကို ThemeData ထဲ ထည့်ချင်တဲ့အခါ ThemeExtension ကို သုံးနိုင်ပါတယ်။
@immutable
class PixlyColors extends ThemeExtension<PixlyColors> {
  const PixlyColors({
    required this.shimmerBase,
    required this.shimmerHighlight,
    required this.photoOverlay,
  });

  /// Skeleton colours for loading placeholders.
  final Color shimmerBase;
  final Color shimmerHighlight;

  /// Dark gradient drawn over photos so white text stays readable.
  final Color photoOverlay;

  static const light = PixlyColors(
    shimmerBase: Color(0xFFE0E0E0),
    shimmerHighlight: Color(0xFFF5F5F5),
    photoOverlay: Color(0x99000000),
  );

  static const dark = PixlyColors(
    shimmerBase: Color(0xFF2C2C2C),
    shimmerHighlight: Color(0xFF3D3D3D),
    photoOverlay: Color(0xB3000000),
  );

  @override
  PixlyColors copyWith({
    Color? shimmerBase,
    Color? shimmerHighlight,
    Color? photoOverlay,
  }) {
    return PixlyColors(
      shimmerBase: shimmerBase ?? this.shimmerBase,
      shimmerHighlight: shimmerHighlight ?? this.shimmerHighlight,
      photoOverlay: photoOverlay ?? this.photoOverlay,
    );
  }

  @override
  PixlyColors lerp(PixlyColors? other, double t) {
    if (other == null) return this;
    return PixlyColors(
      shimmerBase: Color.lerp(shimmerBase, other.shimmerBase, t)!,
      shimmerHighlight: Color.lerp(
        shimmerHighlight,
        other.shimmerHighlight,
        t,
      )!,
      photoOverlay: Color.lerp(photoOverlay, other.photoOverlay, t)!,
    );
  }
}
ThemeExtension ကို extend လုပ်တဲ့အခါ method ၂ ခုကို မဖြစ်မနေ override လုပ်ပေးရပါတယ်။
copyWith- တချို့ value တွေပဲ ပြောင်းပြီး ကျန်တာတွေကို ဒီအတိုင်း ထားချင်တဲ့အခါ object အသစ် ပြန်ထုတ်ပေးဖို့ ဖြစ်ပါတယ်။PixlyColorsရဲ့ field တွေကfinalဖြစ်တဲ့အတွက် တန်ဖိုးကို တိုက်ရိုက် ပြင်လို့ မရပါဘူး။ ဒါကြောင့် ပြင်ချင်တဲ့ field ကိုပဲ ပေးပြီး ကျန်တာတွေကို မူလတန်ဖိုး (this.xxx) နဲ့ object အသစ် ဆောက်ပေးတာ ဖြစ်ပါတယ်။lerp- Linear interpolation ရဲ့ အတိုကောက်ပါ။ light theme ကနေ dark theme ကို ပြောင်းတဲ့အခါ Flutter က theme နှစ်ခုကြားကို animation နဲ့ ဖြည်းဖြည်းချင်း ပြောင်းပေးပါတယ်။ ဒီ animation အတွင်းtက 0.0 (light) ကနေ 1.0 (dark) ထိ ပြောင်းသွားပြီးColor.lerpနဲ့ အရောင်နှစ်ခုကြားက တန်ဖိုးကို တွက်ပေးတာ ဖြစ်ပါတယ်။lerpကို မှန်မှန်ကန်ကန် ရေးထားမှ ကိုယ်ပိုင် အရောင်တွေပါ Material အရောင်တွေနဲ့ အတူ ချောချောမွေ့မွေ့ ပြောင်းသွားမှာပါ။
ပြီးရင်တော့ ThemeData ရဲ့ extensions ထဲမှာ brightness ပေါ် မူတည်ပြီး PixlyColors.light ဒါမှမဟုတ် PixlyColors.dark ကို ထည့်ပေးလိုက်ရုံပါပဲ။
Theme ထဲက value တွေကို ပြန်ယူသုံးခြင်း
final pixly = Theme.of(context).extension<PixlyColors>()!;extension<PixlyColors>() က PixlyColors? (nullable) ကို ပြန်ပေးပါတယ်။ Pixly ရဲ့ theme နှစ်ခုလုံးမှာ extension ထည့်ထားတဲ့အတွက် null မဖြစ်နိုင်လို့ ! သုံးထားတာပါ။ ဒါပေမယ့် ဒီလိုင်းကြီးကို နေရာတိုင်း ရေးနေရတာ ရှည်ပါတယ်။ ဒီတော့ Day 11 မှာ လေ့လာခဲ့တဲ့ extension method ကို သုံးပြီး တိုအောင် လုပ်လိုက်ပါမယ်။
/// Shortcut: `context.pixlyColors.shimmerBase`
extension PixlyThemeX on BuildContext {
  PixlyColors get pixlyColors => Theme.of(this).extension<PixlyColors>()!;
}
အခုဆိုရင် widget ဘယ်နေရာမှာ မဆို context.pixlyColors.shimmerBase ဆိုပြီး လွယ်လွယ်ကူကူ ခေါ်သုံးလို့ ရသွားပါပြီ။
main.dart
// lib/main.dart
import 'package:flutter/material.dart';
import 'package:pixly/config/constants.dart';
import 'package:pixly/config/theme.dart';
import 'package:pixly/screens/home_screen.dart';

void main() {
  runApp(const PixlyApp());
}

class PixlyApp extends StatelessWidget {
  const PixlyApp({super.key});

  @override
  Widget build(BuildContext context) {
    return MaterialApp(
      title: AppConstants.appName,
      debugShowCheckedModeBanner: false,
      theme: AppTheme.lightTheme,
      darkTheme: AppTheme.darkTheme,
      themeMode: ThemeMode.system,
      home: const HomeScreen(),
    );
  }
}
flutter create က ထုတ်ပေးတဲ့ counter app ကို အပေါ်က code နဲ့ အစားထိုးလိုက်တာ ဖြစ်ပါတယ်။ PixlyColors နဲ့ PixlyThemeX ကိုလဲ AppTheme နဲ့ အတူ lib/config/theme.dart ထဲမှာပဲ ထားထားပါတယ်။
theme နဲ့ darkTheme နှစ်ခုလုံး ပေးထားပြီး themeMode: ThemeMode.system လို့ သတ်မှတ်ထားတဲ့အတွက် phone ရဲ့ setting မှာ dark mode ဖွင့်ထားရင် dark theme၊ ပိတ်ထားရင် light theme ကို အလိုအလျောက် သုံးပေးသွားမှာပါ။ user ကိုယ်တိုင် ရွေးလို့ရတဲ့ dark mode toggle ကိုတော့ Day 36 မှာ ထည့်ပါမယ်။
Theme ကို စမ်းကြည့်ခြင်း
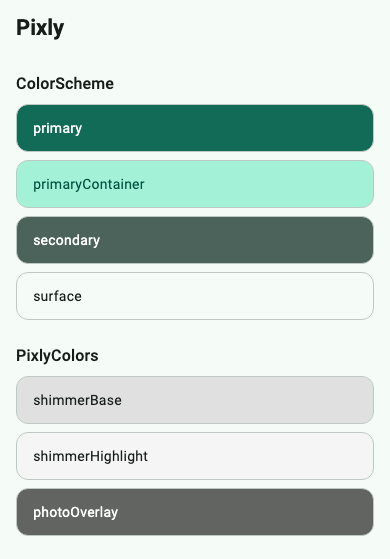
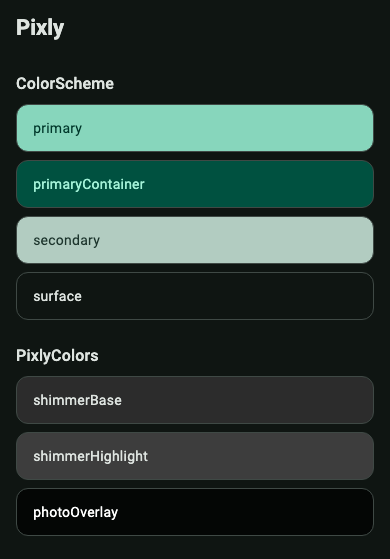
Theme မှန်မမှန် မြင်ရအောင် ယာယီ HomeScreen မှာ အရောင်တွေကို စာရင်းလိုက် ပြကြည့်ပါမယ်။
// lib/screens/home_screen.dart
import 'package:flutter/material.dart';
import 'package:pixly/config/constants.dart';
import 'package:pixly/config/theme.dart';

class HomeScreen extends StatelessWidget {
  const HomeScreen({super.key});

  @override
  Widget build(BuildContext context) {
    final colorScheme = Theme.of(context).colorScheme;
    final pixly = context.pixlyColors;

    return Scaffold(
      appBar: AppBar(title: const Text(AppConstants.appName)),
      body: ListView(
        padding: const EdgeInsets.all(16),
        children: [
          Text('ColorScheme', style: Theme.of(context).textTheme.titleMedium),
          const SizedBox(height: 8),
          _Swatch('primary', colorScheme.primary, colorScheme.onPrimary),
          _Swatch(
            'primaryContainer',
            colorScheme.primaryContainer,
            colorScheme.onPrimaryContainer,
          ),
          _Swatch('secondary', colorScheme.secondary, colorScheme.onSecondary),
          _Swatch('surface', colorScheme.surface, colorScheme.onSurface),
          const SizedBox(height: 16),
          Text('PixlyColors', style: Theme.of(context).textTheme.titleMedium),
          const SizedBox(height: 8),
          _Swatch('shimmerBase', pixly.shimmerBase, colorScheme.onSurface),
          _Swatch(
            'shimmerHighlight',
            pixly.shimmerHighlight,
            colorScheme.onSurface,
          ),
          _Swatch('photoOverlay', pixly.photoOverlay, Colors.white),
        ],
      ),
    );
  }
}
_Swatch ကတော့ အရောင်တခုကို နာမည်နဲ့ အတူ ပြပေးတဲ့ widget လေး ဖြစ်ပါတယ်။
class _Swatch extends StatelessWidget {
  const _Swatch(this.name, this.color, this.onColor);

  final String name;
  final Color color;
  final Color onColor;

  @override
  Widget build(BuildContext context) {
    return Container(
      height: 48,
      margin: const EdgeInsets.only(bottom: 8),
      padding: const EdgeInsets.symmetric(horizontal: 16),
      alignment: .centerLeft,
      decoration: BoxDecoration(
        color: color,
        borderRadius: BorderRadius.circular(12),
        border: Border.all(color: Theme.of(context).colorScheme.outlineVariant),
      ),
      child: Text(name, style: TextStyle(color: onColor)),
    );
  }
}
🧪flutter createက ထုတ်ပေးတဲ့test/widget_test.dartထဲမှာ counter app (MyApp,+button) ကို စမ်းတဲ့ test ပါပါတယ်။MyAppကိုPixlyAppနဲ့ အစားထိုးလိုက်ပြီဆိုတော့ အဲ့ဒီ test က compile error တက်ပါလိမ့်မယ်။ အခုအတွက်တော့ အဲ့ဒီ file ကို ဖျက်လိုက်ပါ ဒါမှမဟုတ် app စဖွင့်ရင်HomeScreenပေါ်မပေါ် စစ်တဲ့ test နဲ့ အစားထိုးပါ။ Testing အကြောင်းကိုတော့ နောက်ပိုင်း Day 86–88 မှာ အသေးစိတ် လေ့လာသွားမှာပါ။
// test/widget_test.dart
import 'package:flutter_test/flutter_test.dart';
import 'package:pixly/main.dart';
import 'package:pixly/screens/home_screen.dart';

void main() {
  testWidgets('app starts on HomeScreen', (tester) async {
    await tester.pumpWidget(const PixlyApp());
    expect(find.byType(HomeScreen), findsOneWidget);
  });
}
Seed color တခုတည်းကနေ light နဲ့ dark မှာ အဆင့်အသွေး ကွဲတဲ့ အရောင် set နှစ်ခု ထွက်လာတာနဲ့ PixlyColors ကလဲ mode ပေါ် မူတည်ပြီး ပြောင်းသွားတာကို တွေ့ရမှာပါ။ ဒီ demo screen ကိုတော့ နောက်ရက်တွေမှာ ဓာတ်ပုံ grid နဲ့ အစားထိုးသွားမှာ ဖြစ်ပါတယ်။
Examples
- Brand color ပြောင်းချင်ရင် →
seedColorတခုတည်း ပြင်ရုံ - Material မှာ မပါတဲ့ အရောင်/spacing/gradient တွေ →
ThemeExtension - Widget ထဲမှာ အရောင် လိုရင် →
Colors.xxxအစားTheme.of(context).colorScheme.xxxဒါမှမဟုတ်context.pixlyColors.xxx
Source code: ဒီနေ့ရဲ့ code အပြည့်အစုံကို GitHub မှာ run ကြည့်လို့ ရပါတယ်။
ဒီနေ့ Day 25 အတွက်ကတော့ ဒီလောက်ပဲ ဖြစ်ပါတယ်။ အဆုံးထိ ဖတ်ပေးတဲ့အတွက် အများကြီး ကျေးဇူးတင်ပါတယ်။ နားမလည်တာတွေ အဆင်မပြေတာတွေ ရှိခဲ့ရင်လဲ အောက်မှာပေးထားတဲ့ discord server ထဲမှာ လာရောက်ဆွေးနွေးနိုင်ပါတယ်။ နောက်နေ့တွေမှာလဲ ဆက်လက်ပြီး sharing လုပ်သွားပေးသွားမှာ ဖြစ်တဲ့အတွက် subscribe လုပ်ထားဖို့ ဖိတ်ခေါ်ပါတယ်။
- Youtube: https://www.youtube.com/@arkarmintun
- Newsletter: https://arkar.dev/
- Discord: https://discord.gg/3xUJ6k6dkH